Showing posts with label Kitchen. Show all posts

Sharp Microwave Oven

Photobucket
The latest and very essential addition to our kitchen... microwave oven from Sharp. Looks like it was made for its place.

Pipe Dreams

Some of you may have noticed that when I installed the under-sink water filter, the white PVC drain pipe was dirty looking and the cement interior of the cabinet under the sink just looked grubby. This of course did not look trick and needed to be rectified.

So, the pipe was painted a vivid shade of metallic green and the cement wall painted white to make it look clean.
Photobucket

Why green, you ask? In case you don't get it by now...
Photobucket

Drinking Water

Last weekend's project was one long overdue, highly essential and perhaps one that makes the most difference to our convenience... installing a drinking water filter.

Photobucket

I went out and bought one from Bacfree, cash and carry. That saves some time and money as we didn't have to wait for them to come and install the thing for us. It isn't rocket science anyway. If you want to know, the under-sink model BS-5 cost RM730 without installation.

So I spent a couple of hours on Sunday evening hooking up the filter, which was a pain because the flexible hose which I bought from the hardware store was faulty and leaked. It's just irritating to have to drive out again to replace a small but essential part.

Finally, the whole thing works according to my grand design:

Turn right for drinking water...
Photobucket

Turn left for pipe water.
Photobucket

DIY: Bar Counter Finishing Touches

The bare concrete bar counter admittedly wasn't finished very well. Shoddy workmanship from the sub-contractor and all who obviously was in a hurry to get it done. Well, if you want things done right, you gotta do it yourself.

Here's what the surface of the countertop looked like before. Dollops of paint from the painters and generally rough around the edges.
Photobucket
Photobucket

This is the surface after working upwards through 120, 240 and 400 grit discs on the power sander. Much smoother and no more blemishes. The swirls you see are the 'grain' of the concrete, much in the same way wood has grain. It's part of the character of the concrete. You can see how the grain in some places has changed after the powersanding.
Photobucket
Photobucket

Next up, wet sanding of the whole surface by hand, using 800 and 1500 grit tungsten carbide sandpaper. Concrete is itself very abrasive, containing sand and other rough stuff. It really wears thru the paper as you can see in the pic. By the time I finished the wet sanding process, it had been a solid 9 hours of sweat.
Photobucket

Here's how the counter looked like after the whole grinding/polishing process.
Photobucket

Next up, sealing and waterproofing the concrete with acrylic water-based sealant.

Step 1: Saturate the surface with water. I used a sponge for this. Let the water penetrate into the concrete for a few minutes.
Photobucket

Step 2: Wash the surface with 50% sealant solution. Let it soak in for a few minutes
Photobucket

Step 3: Gradually add 100% sealant onto the wet surface until its fully covered with full strength sealant. Let it penetrate for a few minutes. When it's soaked in nicely, wipe up the excess with a damn cloth. Let it cure for 30 mins or so, then repeat a 2nd coat.
Photobucket
Photobucket

Here's what it looks like all done. You can see a slight satin transluscent sheen on the countertop. That's the layer of acrylic that's formed on the surface. It's now waterproof.
Photobucket
Photobucket

And after all that hard work, ladies and gentlemen I present to you, the piece de la resistance...
Photobucket
Photobucket

Le Tour de Downstairs

Sorry for the long silence, I've been busy honeymooning, settling in to married life, getting my ass whipped at work, and most importantly, we didn't have internet in the crib when we first moved in.

Anyway, the house is done, and we're now living in it. We managed to move in the day after our wedding, spot on the deadline which is great.

I suppose you readers all want to see the end result of all the hard work now, so here goes...

This is the view through the front door, as you first enter. The faux-wooden 'boardwalk' is in. The material is Chalet Oak from Inovar floor. It feels great to walk on, almost like real wood.
Photobucket

This is the view standing at the front foyer and looking towards the back of the house. The pillar with the iron pipe has been boxed up with a shelving unit.
Photobucket

The living area, before we unpacked the sofa. Flooring is Canyon Oak, from Inovar. It's their entry level product, but it looks and feels decent nontheless. You may notice the lack of skirting on the wall. I requested for a flushed installation with end-profiles. Skirting is so yesterday.
Photobucket

L-shaped sofa set. From Enoma Collection, LDP Furniture Mall. Sounds like a cross between Renoma and Enema. No Enemas on my sofa, thank you. That said, it's pretty comfy and we got a good deal on it.
Photobucket

View from the kitchen looking out towards the front. Pardon the curtain rail, at that point it was just makeshift and I've since installed it properly and trimmed it to size. Finished pix on that later. Pardon the pile of trash too.
Photobucket

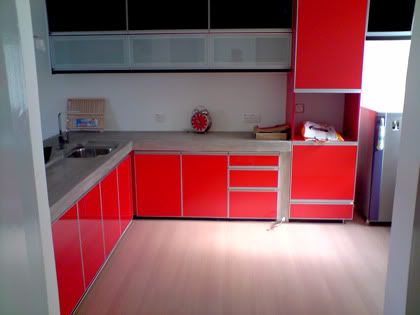
Several shots of the open kitchen.
Photobucket
Photobucket
Photobucket

And this is the view that greets us in the morning when we come down the stairs.
Photobucket

Day_52: The Show Must Go On

Despite the inevitable shennanigans creeping up here and there, progress continues to be made on the crib.

The marble floor gets shined up real nice
Photobucket
Photobucket
Photobucket

The bar counter gets tricked with some pimp-ass black on black tiles
Photobucket
Photobucket
Photobucket

The skirting on the interior of the bar counter gets built
Photobucket

And this is where the house stands now.
Upstairs:
Photobucket

Downstairs:
Photobucket

Day_47: Bar Counter Shennanigans

Let's start with some good news first lah. The parquet flooring looks fabulous now, after varnishing. Yes, still a little mismatched, but its not so bad.
Photobucket
PhotobucketPhotobucket

Now on to that **** bar counter...

As you can see, stage 1 of the concrete work went according to plan. I was thinking this is all going quite well. I laid out the wood where I wanted the 1 inch recess to fall.


Photobucket

When I came back to the house after work:
Photobucket
DUDE! I thought my design was to go straight across the bowl of the sink, not to curve around it. The contractor obviously took his own creative licence or something. Grrr... smells like a rectification job to me.

Anyway, here's a view looking in to the kitchen with the bar counter in place.
Photobucket

Over and out. For now.

Day_46: Bar Counter [UPDATE]

This here's the source of much of my stress: the bar counter that fell through the cracks. Quite literally.
While it was great to finally get work on this started, it wasn't all smooth sailing.

When I got there first thing in the morning, the contractor (different one from the main contractor) had already hacked the wall in the wrong place. This is despite my drawing on the floor the exact plan for the kitchen. The hacking on the right is the wrong one.
Photobucket

I laid the cornerstones exactly how I wanted them.
Photobucket

Later on in the day at lunchtime, there's progress. The wooden formwork is built. But they had marked the hole for the sink in the wrong place. Why does this sound familiar? Lucky I caught the mistake before any real damage was done.

View from the rear of the bar counter.
Photobucket

View from the front. The extra brickwall jutting out on the right is for knee-room when seated.
Photobucket

The hole to seat the sink in. Positioned CORRECTLY.


Photobucket 

As of now they've poured the concrete into the form already. Hope it turns out according to expectations when I go there in the morning. Stay tuned.
As promised, here are the pics of the day, although by now the day's kinda over.

Parquet flooring in the master bedroom before:
The condition is crummy, after being trodden on and abused by construction workers.
Photobucket
The patch where the old master bathroom used to be.
Before and after
Photobucket
Photobucket
The patch where the old balcony used to be
Before and after.
Photobucket
Photobucket

You may notice the parquet doesn't exactly match, but that's apparently because modern parquet doesn't come in the size that vintage parquet used to come in. Modern one is slightly bigger.
top