Showing posts with label DIY. Show all posts

Timber Fencing Construction with Resak Wood - Finale

Photobucket

Here it is, all done. I designed it to have no visible fasteners from the outside. I often think that in Malaysia, people spend big money getting contractors to build mega-bucks timber fences for them only to have the aesthetic spoilt by too many visible rivets/bolts. The devil's in the details.

The edges in the near side of the pic are irregular. It was intentional, and I wasn't sure how it would turn out. Either you like it or hate it.

Timber Fencing Construction with Resak Wood - Epi. 3

Now that the old chainlink is down, we can move on to constructing the timber fence proper. This is the eventual goal... or something quite similar.
Photobucket

This weekend I got around to removing the old chainlink fence to put up the new timber fence, but I got interrupted by rain. I managed to get the chainlink down, but only managed to get the main framework of the wooden fence up, which is the hardest part of the job anyway.

Chainlink fences are held up with these iron bolts, which have a habit of rusting through and fusing together so that it's impossible to get them off with a wrench.
Photobucket
Photobucket

Timber Fencing Construction with Resak Wood - Epi. 1

Over the weekend I managed to track down a timber yard in Puchong that sells resak wood, the wood of choice for outdoor applications as its very hard and very durable. 2 sizes are needed, 2x1 inches for vertical support columns and 1.5x1/2 inches for the horizontal strips.
Photobucket

2 Effective Natural Cat Repellents

Problem:
Photobucket
Yeah, cats are all cute and cuddly until they start using your front lawn as a litter box. This one has staked its claim on my polycarbonate roofing. I hear cats are a problem for many people, so here's what we do to get rid of them quite effectively.

Power Tools for Fools

Photobucket

Yes, there is a new A-team movie coming out. And if you remember what the A-Team was all about, it was a heavy machinery orgy. This is the perfect excuse for a post on my arsenal of power tools, and no they're not for fools.

Photobucket
Bosch GSR 3.6v cordless screwdriver and Talon 12v cordless drill/driver. The pocket sized Bosch packs quite a bit of muscle for its small size, and is easy to use. Combine it with an array of Phillips, Flat and Hex heads and you'll blow through all your Ikea, and other DIY installation jobs. But for really big projects that involve plenty of screwing around, you want the 12v cordless drill to really pack a punch. And yeah, you gotta love cordless mobility and maneuverability. I pity the fool who go messin' around with wires all day.

Carpet Tiles for Utility Room

We don't have any immediate use for the utility room downstairs, but it does get traffic passing through since we relocated the bathroom entrance in there. So, the floor needed to be made presentable while we didn't wanna spend a lot of money getting it done.

Found some used but decent carpet tiles going for cheap at a junkshop in Puchong, hunted down some carpet cleaning foam at Ace, and make it work with good old fashioned elbow grease.

Before
Photobucket
Pardon the mess in the bathroom, temporarily placed it there to get it off the floor.
Photobucket

After
Photobucket

Breakdown of costs:
Used carpet tiles - RM80 (RM2 x 40pcs)
3M Carpet Cleaner - RM60 (RM30 x 2 cans)
Elbow Grease - RMPriceless

Pipe Dreams

Some of you may have noticed that when I installed the under-sink water filter, the white PVC drain pipe was dirty looking and the cement interior of the cabinet under the sink just looked grubby. This of course did not look trick and needed to be rectified.

So, the pipe was painted a vivid shade of metallic green and the cement wall painted white to make it look clean.
Photobucket

Why green, you ask? In case you don't get it by now...
Photobucket

Drinking Water

Last weekend's project was one long overdue, highly essential and perhaps one that makes the most difference to our convenience... installing a drinking water filter.

Photobucket

I went out and bought one from Bacfree, cash and carry. That saves some time and money as we didn't have to wait for them to come and install the thing for us. It isn't rocket science anyway. If you want to know, the under-sink model BS-5 cost RM730 without installation.

So I spent a couple of hours on Sunday evening hooking up the filter, which was a pain because the flexible hose which I bought from the hardware store was faulty and leaked. It's just irritating to have to drive out again to replace a small but essential part.

Finally, the whole thing works according to my grand design:

Turn right for drinking water...
Photobucket

Turn left for pipe water.
Photobucket

DIY: Bar Counter Finishing Touches

The bare concrete bar counter admittedly wasn't finished very well. Shoddy workmanship from the sub-contractor and all who obviously was in a hurry to get it done. Well, if you want things done right, you gotta do it yourself.

Here's what the surface of the countertop looked like before. Dollops of paint from the painters and generally rough around the edges.
Photobucket
Photobucket

This is the surface after working upwards through 120, 240 and 400 grit discs on the power sander. Much smoother and no more blemishes. The swirls you see are the 'grain' of the concrete, much in the same way wood has grain. It's part of the character of the concrete. You can see how the grain in some places has changed after the powersanding.
Photobucket
Photobucket

Next up, wet sanding of the whole surface by hand, using 800 and 1500 grit tungsten carbide sandpaper. Concrete is itself very abrasive, containing sand and other rough stuff. It really wears thru the paper as you can see in the pic. By the time I finished the wet sanding process, it had been a solid 9 hours of sweat.
Photobucket

Here's how the counter looked like after the whole grinding/polishing process.
Photobucket

Next up, sealing and waterproofing the concrete with acrylic water-based sealant.

Step 1: Saturate the surface with water. I used a sponge for this. Let the water penetrate into the concrete for a few minutes.
Photobucket

Step 2: Wash the surface with 50% sealant solution. Let it soak in for a few minutes
Photobucket

Step 3: Gradually add 100% sealant onto the wet surface until its fully covered with full strength sealant. Let it penetrate for a few minutes. When it's soaked in nicely, wipe up the excess with a damn cloth. Let it cure for 30 mins or so, then repeat a 2nd coat.
Photobucket
Photobucket

Here's what it looks like all done. You can see a slight satin transluscent sheen on the countertop. That's the layer of acrylic that's formed on the surface. It's now waterproof.
Photobucket
Photobucket

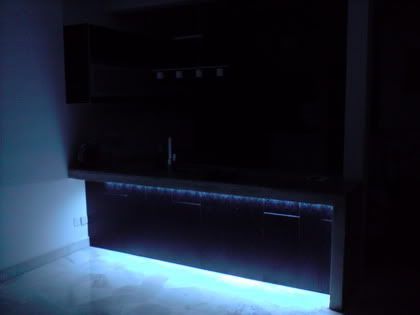
And after all that hard work, ladies and gentlemen I present to you, the piece de la resistance...
Photobucket
Photobucket

Gulp

One day we turned on the tap in the wet kitchen, which runs from the water mains, and were quite disgusted at the colour. I realised that the external water filter hadn't been changed since the previous owner moved out over a year ago, and a lot of water had since passed thru it during the construction process etc. I had totally forgotten about the external filter because it was overgrown by a huge bush in front of the house, which by the way also needs some urgent trimming.

We went out and bought a whole new unit, not even gonna bother to replace the old filter element. Those things are cheap these days anyway. Check out the old filter. It's like a cess pool in there. Totally, absolutely disgusting.
Photobucket

An elbow pipe. This is after the filter in the line. Also fully disgusting inside. Decided to buy a new elbow too.
Photobucket
Photobucket

I had to cut a path thru the bush to get to the filter, which was installed over the drain. It really stank in there, decaying organic matter and all. But in the end, WIN for the plumber.
Photobucket
top